
BlueShield Technologies
Total Activity
29
Last Activity
5 Year Ago
Member Since
04 Mar 2019
Articles
Recent activity by BlueShield Technologies
OWA session timed out - SBS 2008
OWA - gives following error
"Your session has timed out. To protect your account from unauthorized access, Outlook Web Access automatically closes its connection to your mailbox after a period of inactivity. Please re-enter your user name and password. "
Try following
Confirm the Authentication on the IIS Virtual directories as below
Default Web Site -> Anonymous Authentication Only.
OWA -> Basic Authentication Only.
Try and disable Form Based Authentication (Enable Basic authentication from EMC) and then test OWA and confirm if your session still gets timed out.
Try Disabling Thrid party AV
Reference (http://www.experts-exchange.com/Software/Server_Software/Email_Servers/Exchange/Q_24506810.html)
IE wont load. Internet Options is missing from Control Panel
Go to Start > Run, and type:
cmd
At the command prompt, type:
expand D:\i386\inetcpl.cp_ C:\Windows\system32\inetcpl.cpl
(adjusting drive letters to suit your system).
To-Re-install IE6 in Windows 2003
Go to C:\Windows\Inf
RightClick on IE.inf and Install. Make sure you have access to all CD and Service Packs been installed on the Server.
Restore Show Desktop Icon - XP
If the Show Desktop icon is deleted from Quick Launch, the procedure below will recreate the file.
Open Notepad and enter the following text:
[Shell]
Command=2
IconFile=explorer.exe,3
[Taskbar]
Command=ToggleDesktop
Save the new file as Show Desktop.scf
Then drag and drop the icon on the Quick Launch bar or whatever location you want the shortcut to appear.
MS Excell 2003 opens shared files slowly
Symptoms: User tries to open network shared Excel sheet using Office 2003. It runs extremely slow, especialy when file size exceeds 1Mbyte.
Resolution:
There is known "bug" of Office 2003 (documented in Microsoft KB - http://support.microsoft.com/kb/2570623) when it opens shared files extremely slow (not always, time to time).
There is FileValidation feature enalbed by default for all Office 2003 applications. When disabled it makes this issue to disappear.
Another option - upgrade to Office 2007 or 2010 - they have smarter FileValidation algorythms which don't affect PCs even in slow speed networking conditions.
UltraVNC for Win7 and 2008 Server
UltraVNC for Windows 7 / 2008 Server
Installation
Download proper installation from http://www.uvnc.com/download/ (x32 and x64 available)
Start installation
Choose "UltraVNC Server only" in most cases
Agree to download Vista addons (important!)
Agree do dowload mirror drivers
Then tick options:
- Register UltraVNC Server as a system service
- Start or restart UltraVNC service
- Create UltraVNC desktop icons
Finish the installation
Install mirror driver
That's important to significantly improve the speed of VNC connection
Goto program folder of UltraVNC and locate drivers.zip (or folder drivers), extract it.
Run install.bat
Agree to install at the dialog appeared
Configuration
Right-click on UltraVNC icon in the tray, choose Admin Properties
Tick:
- "Accept socket connections"
- "Do nothing" at "When last client disconnects"
- "Keep existng connection" at "Multiviewer connections"
- "Remove Aero (Vista)"
Set password in "VNC Password"
Apply settings, close window.
Right-click on UltraVNC icon in the tray, choose Properties
Tick "Video Hook Driver", Apply settings, close window
Fixing "Ctrl+Alt+Del" behaviour
Be sure the UAC is disabled
Add the following to the registry:
Location: HKEY_LOCAL_MACHINE\SOFTWARE\Microsoft\Windows\CurrentVersion\Policies\System
Key: «SoftwareSASGeneration»=dword:00000001
Reboot the PC
How to repair or setup the Zebra / Eltron TLP 2642 printer driver:
REMOVING THE DRIVERS:
1. Go to start menu --> Devices and Printers
2. Highlight (or click once) on the old or non-working driver
3. On the tab at the "Devices and Printers" window, select "Print Server Properties"
4. Select "Driver" tab and remove all zebra and eltron drivers related to the current printer.
+ If any driver cannot be deleted:
- Right click on the non-working printer icon at "Devices and Printers" window and remove it.
ELTRON DRIVER INSTALLATION:
1. Download the driver from the attachment
2. Change the file extension name to ".exe" (remove the ".txt" file)
3. Double click the file
4. Follow the instruction in the wizard and choose the correct driver from the lists.
5. Finish the installation
Test the printer and also the correct size. For example:
* Eltron TLP-2642 = 10cm (W) x 15cm (H)
The printer should work fine by now. Below is the good website to find any printer driver that is not around on the website:
When you log on to a Windows Vista-based or a Windows 7-based computer by using a temporary profile, you receive the following error message:
The User Profile Service failed the logon. User profile cannot be loaded.
This error may occur if the "Do not logon users with temporary profiles" Group Policy setting is configured.
|


Close Registry Editor.
Restart the computer.
Log on again with your account.
Method 2: Log on to Windows and copy your data to a new account
reate a new account and copy the data from the old account to the new account. For information about how to do this, visit one of the following Microsoft websites:
Windows 7Windows Vista
 Back to the top
Method 3: Delete the error SID and create a new profile
To delete the error SID and create a new profile, follow the steps below:
- Delete the error SID.
To have us fix this problem for you, go to the "Fix it for me" section. If you would rather fix it yourself, go to the "Let me fix it myself" section.
Fix it for me
To fix this problem automatically , click the Fix this problem link. Then click Run in the File Download dialog box, and follow the steps in this wizard.Fix this problem
Microsoft Fix it 50446
Note This wizard may be in English only; however, the automatic fix also works for other language versions of Windows.
Note If you are not on the computer that has the problem, you can save the automatic fix to a flash drive or to a CD, and then you can run it on the computer that has the problem.Let me fix it myself
Important This section, method, or task contains steps that tell you how to modify the registry. However, serious problems might occur if you modify the registry incorrectly. Therefore, make sure that you follow these steps carefully. For added protection, back up the registry before you modify it. Then, you can restore the registry if a problem occurs. For more information about how to back up and restore the registry, click the following article number to view the article in the Microsoft Knowledge Base:
How to back up and restore the registry in Windows
To resolve this problem yourself, follow these steps:- Delete the profile by using the Computer Properties dialog box. To do this, follow these steps:
- Click Start, right-click Computer, and then clickProperties.
- Click Change settings.
- In the System Properties dialog box, click theAdvanced tab.
- Under User Profiles, click Settings.
- In the User Profiles dialog box, select the profile that you want to delete, click Delete, and then click OK.
- Click Start
, type regedit in the Start search box, and then press ENTER.
- Locate and then expand the following registry subkey:
HKEY_LOCAL_MACHINE\SOFTWARE\Microsoft\Windows NT\CurrentVersion\ProfileList
- Right-click the SID that you want to remove, and then clickDelete.
- Delete the profile by using the Computer Properties dialog box. To do this, follow these steps:
- Log on to the computer and create a new profile.
Origianl Article: http://support.microsoft.com/kb/947215
How to add Google Search in IE8
To add Google Search in IE8
http://www.iegallery.com/en-US/Addons/Details/813
and add Google as your default search engine
Happy googling!
IE7: http://www.iegallery.com/en-US/addonsie7/Detail?resourceId=13555
How to: Fix Ctrl + Alt + Del for remote computers
Windows Vista introduced a new group policy setting which controls whether or not software can simulate a Secure Attention Sequence (SAS). An example of such SAS is the CTRL-ALT-DEL combination. This policy needs to be enabled in order for VNC Viewer to send CTRL-ALT-DEL to the remote machine running Windows Vista/Windows 7. You will only need to do this once for a givven remote computer.
Important: Since Windows Vista Home Basic and Windows Vista Home Premium do not have the Group Policy Object Editor, you will not be able to send CTRL-ALT-DEL to machines running those versions of Windows Vista.
There are two ways of setting the needed group policy setting, depending on whether the remote computer is connected to a domain or is a member of a workgroup. Please follow the appropriate section depending on your setup.
Domain procedure (change domain group policy setting)
If the remote computer is connected to a domain, the domain administrator can enable this group policy setting for subdomains or for the entire domain. Please follow these steps:
Important: Only a domain administrator can modify the domain group policy
Important: The domain group policy overrides the local group policy. If the domain group policy is not set, you can use local group policy setting mentioned in the next section.
- Login to the remote computer as the domain administrator.
- Click the Start Windows button, select Run, type gpmc.msc and press enter.
- In the left section, select the desired domain, then right-click and choose Create a GPO in this domain, and link it here.
- Right-click the new GPO and select Edit.
- In the left section, please navigate to: Computer Configuration - Administrative Templates - Windows Components - Windows Logon Options
- In the right section, please double-click on the Disable or enable software Secure Attention Sequence policy and click on Enabled.
- Set the policy option to Services.
- Click OK and close the Group Policy Object Editor.
You have now enabled the sending of Ctrl-Alt-Del on all computers that are connected to the domain you selected in step 3.
Workgroup procedure (change local group policy setting)
If the remote computer is a member of a workgroup or is connected to a domain with no domain group policy set, you should follow these steps:
- Login to the remote computer as a local or domain administrator.
- Click the Start Windows button, select Run, type gpedit.msc and press enter.
- In the left section, please navigate to: Computer Configuration - Administrative Templates - Windows Components - Windows Logon Options
- In the right section, please double-click on the Disable or enable software Secure Attention Sequence policy and click on Enabled.
- Set the policy option to either Services or Services and Ease of Access applications.
- Click OK and close the Group Policy Object Editor.
Source: http://kb.realvnc.com/questions/102/How+can+I+enable+the+%22software+Secure+Attention+Sequence%22+policy%3F
How to: Access Administrative-privileged Run command via Command prompt in Win7 or Vista
In the domain environment where users do not have Local Admin right and you need to perform local admin task without switching user account, technicians can use elevated CMD prompt to run Win7 or Vista programs such as adding/removing local administrator with lusrmgr.msc or uninstall program with appwiz.cpl. You can also use the cmd to open explorer.exe to modify network folders with your Domain account (only if you run the cmd with domain account)
- click Start
- In the search field type in cmd
- Press shift and right click on cmd icon and click Run as different user
- Login with Local/Domain administration right
- Admin-elevated CMD will open and you will be able to run Windows programs

List of Run Commands in Windows 7
| Program Name | Run Command |
| About Windows | winver |
| Add a Device | devicepairingwizard |
| Add Hardware Wizard | hdwwiz |
| Advanced User Accounts | netplwiz |
| Authorization Manager | azman |
| Backup and Restore | sdclt |
| Bluetooth File Transfer | fsquirt |
| Calculator | calc |
| Certificates | certmgr |
| Change Computer Performance Settings | systempropertiesperformance |
| Change Data Execution Prevention Settings | systempropertiesdataexecutionprevention |
| Change Printer Settings | printui |
| Character Map | charmap |
| ClearType Tuner | cttune |
| Color Management | colorcpl |
| Command Prompt | cmd |
| Component Services | comexp |
| Component Services | dcomcnfg |
| Computer Management | compmgmt |
| Computer Management | compmgmtlauncher |
| Connect to a Network Projector | netproj |
| Connect to a Projector | displayswitch |
| Control Panel | control |
| Create A Shared Folder Wizard | shrpubw |
| Create a System Repair Disc | recdisc |
| Credential Backup and Restore Wizard | credwiz |
| Data Execution Prevention | systempropertiesdataexecutionprevention |
| Default Location | locationnotifications |
| Device Manager | devmgmt |
| Device Pairing Wizard | devicepairingwizard |
| Diagnostics Troubleshooting Wizard | msdt |
| Digitizer Calibration Tool | tabcal |
| DirectX Diagnostic Tool | dxdiag |
| Disk Cleanup | cleanmgr |
| Disk Defragmenter | dfrgui |
| Disk Management | diskmgmt |
| Display | dpiscaling |
| Display Color Calibration | dccw |
| Display Switch | displayswitch |
| DPAPI Key Migration Wizard | dpapimig |
| Driver Verifier Manager | verifier |
| Ease of Access Center | utilman |
| EFS REKEY Wizard | rekeywiz |
| Encrypting File System Wizard | rekeywiz |
| Event Viewer | eventvwr |
| Fax Cover Page Editor | fxscover |
| File Signature Verification | sigverif |
| Font Viewer | fontview3 |
| Getting Started | gettingstarted |
| IExpress Wizard | iexpress |
| Import to Windows Contacts | wabmig1 |
| Install or Uninstall Display Languages | lusrmgr |
| Internet Explorer | iexplore1 |
| iSCSI Initiator Configuration Tool | iscsicpl |
| iSCSI Initiator Properties | iscsicpl |
| Language Pack Installer | lpksetup |
| Local Group Policy Editor | gpedit |
| Local Security Policy | secpol |
| Local Users and Groups | lusrmgr |
| Location Activity | locationnotifications |
| Magnifier | magnify |
| Malicious Software Removal Tool | mrt |
| Manage Your File Encryption Certificates | rekeywiz |
| Math Input Panel | mip1 |
| Microsoft Management Console | mmc |
| Microsoft Support Diagnostic Tool | msdt |
| NAP Client Configuration | napclcfg |
| Narrator | narrator |
| New Scan Wizard | wiaacmgr |
| Notepad | notepad |
| ODBC Data Source Administrator | odbcad32 |
| ODBC Driver Configuration | odbcconf |
| On-Screen Keyboard | osk |
| Paint | mspaint |
| Performance Monitor | perfmon |
| Performance Options | systempropertiesperformance |
| Phone Dialer | dialer |
| Presentation Settings | presentationsettings |
| Print Management | printmanagement |
| Printer Migration | printbrmui |
| Printer User Interface | printui |
| Private Character Editor | eudcedit |
| Problem Steps Recorder | psr |
| Protected Content Migration | dpapimig |
| Registry Editor | regedit |
| regedt324 | |
| Remote Access Phonebook | rasphone |
| Remote Desktop Connection | mstsc |
| Resource Monitor | resmon |
| perfmon /res | |
| Resultant Set of Policy | rsop |
| Securing the Windows Account Database | syskey |
| Services | services |
| Set Program Access and Computer Defaults | computerdefaults |
| Share Creation Wizard | shrpubw |
| Shared Folders | fsmgmt |
| Snipping Tool | snippingtool |
| Sound Recorder | soundrecorder |
| SQL Server Client Network Utility | cliconfg |
| Sticky Notes | stikynot |
| Stored User Names and Passwords | credwiz |
| Sync Center | mobsync |
| System Configuration | msconfig |
| System Configuration Editor | sysedit5 |
| System Information | msinfo32 |
| System Properties (Advanced Tab) | systempropertiesadvanced |
| System Properties (Computer Name Tab) | systempropertiescomputername |
| System Properties (Hardware Tab) | systempropertieshardware |
| System Properties (Remote Tab) | systempropertiesremote |
| System Properties (System Protection Tab) | systempropertiesprotection |
| System Restore | rstrui |
| Tablet PC Input Panel | tabtip1 |
| Task Manager | taskmgr |
| Task Scheduler | taskschd |
| Trusted Platform Module (TPM) Management | tpm |
| User Account Control Settings | useraccountcontrolsettings |
| Utility Manager | utilman |
| Version Reporter Applet | winver |
| Volume Mixer | sndvol |
| Windows Activation Client | slui |
| Windows Anytime Upgrade Results | windowsanytimeupgraderesults |
| Windows Contacts | wab1 |
| Windows Disc Image Burning Tool | isoburn |
| Windows DVD Maker | dvdmaker1 |
| Windows Easy Transfer | migwiz1 |
| Windows Explorer | explorer |
| Windows Fax and Scan | wfs |
| Windows Features | optionalfeatures |
| Windows Firewall with Advanced Security | wf |
| Windows Help and Support | winhlp32 |
| Windows Journal | journal1 |
| Windows Media Player | dvdplay2 |
| wmplayer1 | |
| Windows Memory Diagnostic Scheduler | mdsched |
| Windows Mobility Center | mblctr |
| Windows Picture Acquisition Wizard | wiaacmgr |
| Windows PowerShell | powershell1 |
| Windows PowerShell ISE | powershell_ise1 |
| Windows Remote Assistance | msra |
| Windows Repair Disc | recdisc |
| Windows Script Host | wscript |
| Windows Update | wuapp |
| Windows Update Standalone Installer | wusa |
| WMI Management | wmimgmt |
| WMI Tester | wbemtest |
| WordPad | write |
| XPS Viewer | xpsrchvw |
Source: http://pcsupport.about.com/od/commandlinereference/a/run-commands-windows-7.htm
Reset Local Administrator Password
If you forgot the administrator password you can easily reset the password on Windows 7, Windows Vista and Windows XP with the Sticky Keys tricks. It works always.
- Boot from Windows PE or Windows RE and access the command prompt.
- Find the drive letter of the partition where Windows is installed. In Vista and Windows XP, it is usually C:, in Windows 7, it is D: in most cases because the first partition contains Startup Repair. To find the drive letter, type C: (or D:, respectively) and search for the Windows folder. Note that Windows PE (RE) usually resides on X:.
- Type the following command (replace “c:” with the correct drive letter if Windows is not located on C:):
copy c:\windows\system32\sethc.exe c:\
This creates a copy of sethc.exe to restore later. - Type this command to replace sethc.exe with cmd.exe:
copy /y c:\windows\system32\cmd.exe c:\windows\system32\sethc.exe
Reboot your computer and start the Windows installation where you forgot the administrator password. - After you see the logon screen, press the SHIFT key five times.
- You should see a command prompt where you can enter the following command to reset the Windows password (see screenshot above):
net user your_user_name new_password
If you don’t know your user name, just type net user to list the available user names. - You can now log on with the new password.
- Replace the sethc.exe with the copy you stored in the folder you selected above (steps 3).
For this, you have to boot up again with Windows PE or RE because you can’t replace system files while the Windows installation is online. Then you have to enter this command:
copy /y c:\sethc.exe c:\windows\system32\sethc.exe
Robocopy /MIR switch – mirroring file permissions

Some customers pointed out what they believe to be a bug in Robocopy.
The situation is: suppose that you copy your files using Robocopy in Windows Server 2003 or XP. Then, file or folder permissions (ACLs) are changed wither on source or destination. You want to use the /MIR switch to mirror the permissions:
> ROBOCOPY source destination /MIR /SEC
Robocopy fails to mirror file permissions – but works for folder permissions.
This behaviour is by design. Robocopy focuses on copying just files that have changed (in size or modified date, by default). If a file looks like it has changed, Robocopy copies its data and, if you specified copying security as well, copies NTFS ACL from source to target after copying the data. If a file looks like it has NOT changed, Robocopy by default skips it, and copies nothing for the file, not even its security info.
When I wrote the “security copy” part of Robocopy on 22 May 1997, I chose to do this for performance reasons, to keep Robocopy times for large trees down. This was an adequate implementation for most peoples’ needs at the time. Also, another reason I chose to do things the way I did, is that setting security on directories is sufficient for most people. Setting security on a file-by-file basis is a more granular approach, for sure, but incurs a larger maintenance overhead, perhaps too much for many users.
Therefore, the solution listed as a workaround posted by Martin Zugec (MVP) is precisely what needs to be done in this situation, and this behaviour is expected:
> ROBOCOPY /Mir <Source> <Target>
> ROBOCOPY /E /Copy:S /IS /IT <Source> <Target>
The first Robocopy command above will copy data and security for files that have been updated, and the second Robocopy command will refresh file security for all files, without copying any file data.
If using a Resource Kit version of Robocopy, and wanting to keep security synced between two trees where the data is fairly static, but security is updated now and then. In fact, the “Copying NTFS Security Information” section of Robocopy.doc (from the Resource Kits) states:
“To refresh security information for existing destination files and directories without copying file data, use the /IS switch together with the /COPY switch without the D flag. For example /IS /COPY:SOU would refresh all security information for all selected files, without copying any file data.”
Things have moved on a bit in the past 11 years, security-wise, so I changed the way things work in this area slightly for the version of Robocopy that ended up in Vista, in that if you specify /SECFIX on the command line, Robocopy will copy security for skipped files that exist in both the source and the target trees.
So, to maintain two trees in sync, including their security, using Vista’s Robocopy, you can use the following as your regular Robocopy command:
> ROBOCOPY <source> <target> /MIR /SEC /SECFIX
/MIR will replicate data and security (as /SEC is specified) for changed files, and /SECFIX will update just the security for unchanged files. Add /V to the command line if you want to see which files are having their security “fixed” without having their data copied.
http://blogs.technet.com/b/filecab/archive/2008/07/31/robocopy-mir-switch-mirroring-file-permissions.aspx
UltraVNC for Win7 and 2008 Server
UltraVNC for Windows 7 / 2008 Server
Installation
Download proper installation from http://www.uvnc.com/download/ (x32 and x64 available)
Start installation
Choose "UltraVNC Server only" in most cases
Agree to download Vista addons (important!)
Agree do dowload mirror drivers
Then tick options:
- Register UltraVNC Server as a system service
- Start or restart UltraVNC service
- Create UltraVNC desktop icons
Finish the installation
Install mirror driver
That's important to significantly improve the speed of VNC connection
Goto program folder of UltraVNC and locate drivers.zip (or folder drivers), extract it.
Run install.bat
Agree to install at the dialog appeared
Configuration
Right-click on UltraVNC icon in the tray, choose Admin Properties
Tick:
- "Accept socket connections"
- "Do nothing" at "When last client disconnects"
- "Keep existng connection" at "Multiviewer connections"
- "Remove Aero (Vista)"
Set password in "VNC Password"
Apply settings, close window.
Right-click on UltraVNC icon in the tray, choose Properties
Tick "Video Hook Driver", Apply settings, close window
Fixing "Ctrl+Alt+Del" behaviour
Be sure the UAC is disabled
Add the following to the registry:
Location: HKEY_LOCAL_MACHINE\SOFTWARE\Microsoft\Windows\CurrentVersion\Policies\System
Key: «SoftwareSASGeneration»=dword:00000001
Reboot the PC
Perform Admin Tasks During Windows Server Installation - Win 2008 R2
Tip:Perform Admin Tasks During Windows Server Installation
Commonly used During Server Admin
Shift+F10
Diskpart
Select Disk 0
Create Partition primary
There may be times when you forget to perform a preinstallation task prior to starting the Windows Server 2008 R2 installation. Rather than restarting the operating system, you can access a command prompt from Setup or use advanced drive options to perform the necessary administrative tasks.
Using the Command Line During Installation
When you access a command prompt from Setup, you access the MINWINPC (mini Windows PC) environment used by Setup to install the OS. During installation, on the Where Do You Want To Install Windows page, you can access a command prompt by pressing Shift+F10. The mini Windows PC environment provides access to many of the same command-line tools that are available in a standard installation of Windows Server 2008 R2. Here’s a look at what’s available.
ARP Displays and modifies the IP-to-physical address translation tables used by the Address Resolution Protocol (ARP).
ASSOC Displays and modifies file extension associations.
ATTRIB Displays and changes file attributes.
CALL Calls a script or script label as a procedure.
CD/CHDIR Displays the name of or changes the current directory.
CHKDSK Checks a disk for errors and displays a report.
CHKNTFS Displays the status of volumes. Sets or excludes volumes from automatic system checking when the computer is started.
CHOICE Creates a list from which users can select one of several choices in a batch script.
CLS Clears the console window.
CMD Starts a new instance of the Windows command shell.
COLOR Sets the colors of the command-shell window.
CONVERT Converts FAT volumes to NTFS.
COPY Copies or combines files.
DATE Displays or sets the system date.
DEL Deletes one or more files.
DIR Displays a list of files and subdirectories within a directory.
DISKPART Invokes a text-mode command interpreter so thatyou can manage disks, partitions, and volumes using a separate command prompt and commands that are internal to DISKPART.
DISM Services and manages Windows images.
DOSKEY Edits command lines, recalls Windows commands, and creates macros.
ECHO Displays messages or turns command echoing on or off.
ENDLOCAL Ends localization of environment changes in a batch file.
ERASE Deletes one or more files.
EXIT Exits the command interpreter.
EXPAND Uncompresses files.
FIND Searches for a text string in files.
FOR Runs a specified command for each file in a set of files.
FORMAT Formats a floppy disk or hard drive.
FTP Transfers files.
FTYPE Displays or modifies file types used in file extension associations.
GOTO Directs the Windows command interpreter to a labeled line in a script.
HOSTNAME Prints the computer’s name.
IF Performs conditional processing in batch programs.
IPCONFIG Displays TCP/IP configuration.
LABEL Creates, changes, or deletes the volume label of a disk.
MD/MKDIR Creates a directory or subdirectory.
MORE Displays output one screen at a time.
MOUNTVOL Manages a volume mount point.
MOVE Moves files from one directory to another directory on the same drive.
NBTSTAT Displays the status of NetBIOS.
NET ACCOUNTS Manages user account and password policies.
NET COMPUTER Adds or removes computers from a domain.
NET CONFIG SERVER Displays or modifies configuration of a server service.
NET CONFIG WORKSTATION Displays or modifies configuration of a workstation service.
NET CONTINUE Resumes a paused service.
NET FILE Displays or manages open files on a server.
NET GROUP Displays or manages global groups.
NET LOCALGROUP Displays or manages local group accounts.
NET NAME Displays or modifies recipients for messenger service messages.
NET PAUSE Suspends a service.
NET PRINT Displays or manages print jobs and shared queues.
NET SEND Sends a messenger service message.
NET SESSION Lists or disconnects sessions.
NET SHARE Displays or manages shared printers and directories.
NET START Lists or starts network services.
NET STATISTICS Displays workstation and server statistics.
NET STOP Stops services.
NET TIME Displays or synchronizes network time.
NET USE Displays or manages remote connections.
NET USER Displays or manages local user accounts.
NET VIEW Displays network resources or computers.
NETSH Invokes a separate command prompt that allows you to manage the configuration of various network services on local and remote computers.
NETSTAT Displays the status of network connections.
PATH Displays or sets a search path for executable files in the current command window.
PATHPING Traces routes and provides packet loss information.
PAUSE Suspends processing of a script and waits for keyboard input.
PING Determines whether a network connection can be established.
POPD Changes to the directory stored by PUSHD.
PRINT Prints a text file.
PROMPT Modifies the Windows command prompt.
PUSHD Saves the current directory and then changes to a new directory.
RD/RMDIR Removes a directory.
RECOVER Recovers readable information from a bad or defective disk.
REG ADD Adds a new subkey or entry to the registry.
REG COMPARE Compares registry subkeys or entries.
REG COPY Copies a registry entry to a specified key path on a local or remote system.
REG DELETE Deletes a subkey or entries from the registry.
REG QUERY Lists the entries under a key and the names of subkeys (if any).
REG RESTORE Writes saved subkeys and entries back to the registry.
REG SAVE Saves a copy of specified subkeys, entries, and values to a file.
REGSVR32 Registers and unregisters DLLs.
REM Adds comments to scripts.
REN Renames a file.
ROUTE Manages network routing tables.
SET Displays or modifies Windows environment variables. Also used to evaluate numeric expressions at the command line.
SETLOCAL Begins localization of environment changes in a batch file.
SFC Scans and verifies protected system files.
SHIFT Shifts the position of replaceable parameters in scripts.
START Starts a new command-shell window to run a specified program or command.
SUBST Maps a path to a drive letter.
TIME Displays or sets the system time.
TITLE Sets the title for the command-shell window.
TRACERT Displays the path between computers.
TYPE Displays the contents of a text file.
VER Displays the Windows version.
VERIFY Tells Windows whether to verify that your files are written correctly to a disk.
VOL Displays a disk volume label and serial number.
Tip adapted from the Microsoft Press book Windows Server 2008 Administrator’s Pocket Consultant, Second Edition by William R. Stanek.
Original Article: http://technet.microsoft.com/hi-in/magazine/gg491396%28en-us%29.aspx
Reset Administrator Password on SBS 2008
Reset Administrator Password on SBS 2008
So you've managed to loose your admin password for your SBS Server 2008 eh? Well in my case, a faulty keyboard caused an incorrect password to be set. Whatever the reason you need to reset the password, I'll assume you're doing this for Good, and not Evil.
Things you'll need:
- Physical access to the server
- Your 2008 install DVD
Step One: Launch recovery console
Put your install DVD in the drive and reboot the server. Make sure you press the key to boot off the DVD. Once it loads, choose your language, then click Repair your computer. Click Command Prompt
Step Two: Do a bit of file jiggery-pokery
Run the following commands in the command prompt:
Basically we're moving Utilman out of the way temporarily and replacing it with cmd.exe (command prompt). Close the command prompt and click Reboot.
Step Three: Do the password reset
Start up your server as normal, and after you press CTRL-ALT-DELETE and have the login screen up, press Windows-U and the command prompt will come up. Type the following:
Where [username] is the username you want to reset the password for, and [password] is the new password. Close the command prompt and log in with the new password!
Step Four: Close that back-door
We want to move the files back to where they were, otherwise anyone could go Windows-U to get an administrator's command prompt. Unfortunately Utilman.exe is a protected file so you can't move it back while in Windows. Reboot back into the recovery console as in Step One, and run the following commands:
All done! Reboot and pat yourself on your back.
Original Article: http://hol.net.nz/blog/reset-administrator-password-on-sbs-2008/
How to: Fix Ctrl + Alt + Del for remote computers
Windows Vista introduced a new group policy setting which controls whether or not software can simulate a Secure Attention Sequence (SAS). An example of such SAS is the CTRL-ALT-DEL combination. This policy needs to be enabled in order for VNC Viewer to send CTRL-ALT-DEL to the remote machine running Windows Vista/Windows 7. You will only need to do this once for a givven remote computer.
Important: Since Windows Vista Home Basic and Windows Vista Home Premium do not have the Group Policy Object Editor, you will not be able to send CTRL-ALT-DEL to machines running those versions of Windows Vista.
There are two ways of setting the needed group policy setting, depending on whether the remote computer is connected to a domain or is a member of a workgroup. Please follow the appropriate section depending on your setup.
Domain procedure (change domain group policy setting)
If the remote computer is connected to a domain, the domain administrator can enable this group policy setting for subdomains or for the entire domain. Please follow these steps:
Important: Only a domain administrator can modify the domain group policy
Important: The domain group policy overrides the local group policy. If the domain group policy is not set, you can use local group policy setting mentioned in the next section.
- Login to the remote computer as the domain administrator.
- Click the Start Windows button, select Run, type gpmc.msc and press enter.
- In the left section, select the desired domain, then right-click and choose Create a GPO in this domain, and link it here.
- Right-click the new GPO and select Edit.
- In the left section, please navigate to: Computer Configuration - Administrative Templates - Windows Components - Windows Logon Options
- In the right section, please double-click on the Disable or enable software Secure Attention Sequence policy and click on Enabled.
- Set the policy option to Services.
- Click OK and close the Group Policy Object Editor.
You have now enabled the sending of Ctrl-Alt-Del on all computers that are connected to the domain you selected in step 3.
Workgroup procedure (change local group policy setting)
If the remote computer is a member of a workgroup or is connected to a domain with no domain group policy set, you should follow these steps:
- Login to the remote computer as a local or domain administrator.
- Click the Start Windows button, select Run, type gpedit.msc and press enter.
- In the left section, please navigate to: Computer Configuration - Administrative Templates - Windows Components - Windows Logon Options
- In the right section, please double-click on the Disable or enable software Secure Attention Sequence policy and click on Enabled.
- Set the policy option to either Services or Services and Ease of Access applications.
- Click OK and close the Group Policy Object Editor.
Source: http://kb.realvnc.com/questions/102/How+can+I+enable+the+%22software+Secure+Attention+Sequence%22+policy%3F
|
ATEN KVM Hot-Key List |
|||||||||||||||
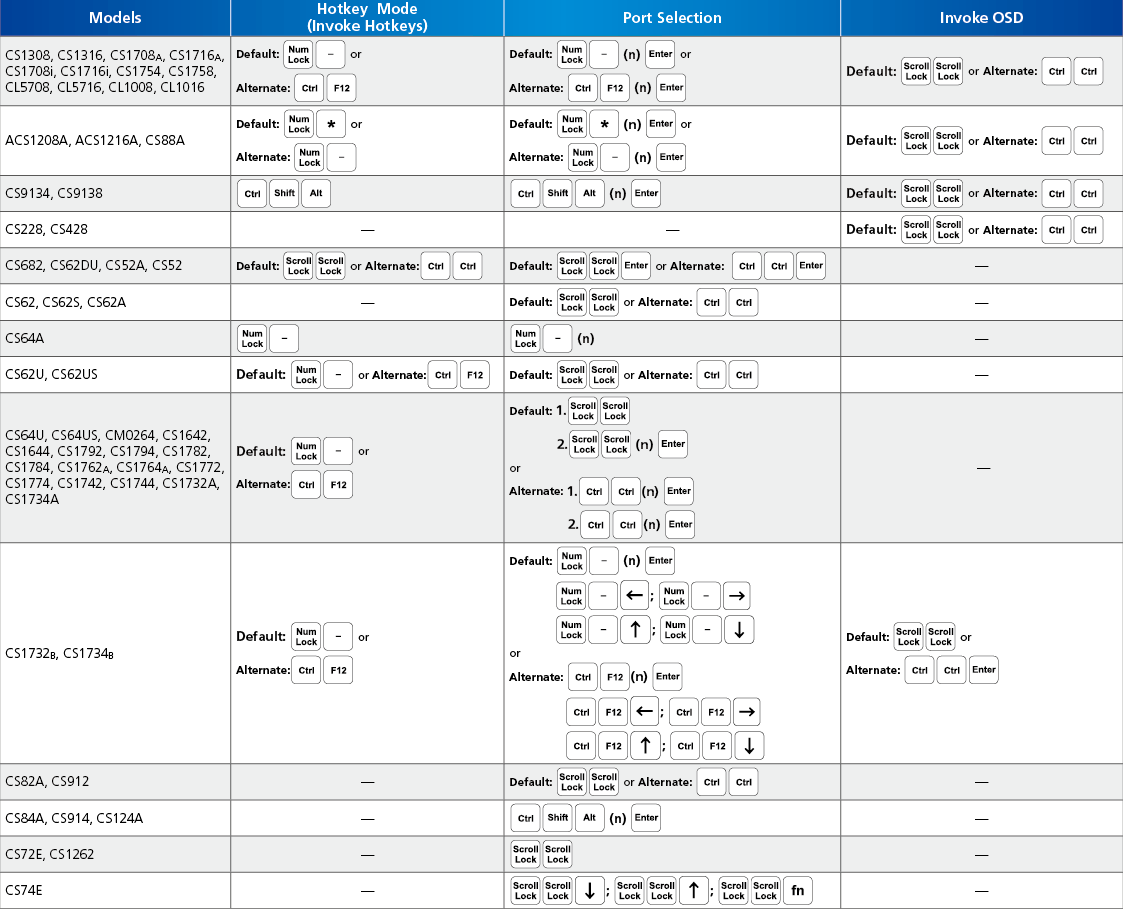 |
|||||||||||||||
|
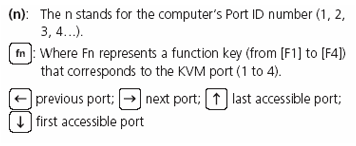
Ref: http://www.aten.com/data/quick_finder/hotkey/hotkey.htm
How to Reset Your Forgotten Domain Admin Password on Server 2008 R2
How to Reset Your Forgotten Domain Admin Password on Server 2008 R2

Forgetting your password is always a pain, but luckily there’s an easy way to reset your Domain Administrator password. All you need is a copy of the Windows Server 2008 R2 installation disk and one simple command line trick.
Replacing Utilman.exe
Boot off the Windows disk and select the “Repair your computer” option from the lower left-hand corner.

Follow through until you get to the option to open the Command Prompt, which you’ll want to select.

First you’ll want to type in the following command to backup the utilman.exe file:
MOVE C:\Windows\System32\Utilman.exe C:\Windows\System32\Utilman.exe.bak

Now you will need to copy cmd.exe and rename it Utilman.exe:
COPY C:\Windows\System32\cmd.exe C:\Windows\System32\Utilman.exe

Now you can go ahead and reboot your machine. When its done booting up again and you are at the Logon screen click on the Ease of access icon.

I bet you weren’t expecting that open a command prompt  To change the password type:
net user administrator *
Once you press enter you will asked to set a new password and then confirm it, when entering your new password don’t worry if you can’t see them as you type, they are invisible, they are however being remembered.

Once you’re logged in again don’t forget to delete Utilman.exe and then rename Utilman.exe.bak back to plain old Utilman.exe.
Telnet -21
SSH -22
HTTP -80
HTTPS -443
SMTP -25
LDAP -389
LDAPs -636
RDP -3389
VNC -5900
VMware VM_cosnole -902
Common SMTP servers
The following is a list of the common Australian ISPs and their associated SMTP servers:
| ISP | SMTP server |
|---|---|
| aaNet | mail.aanet.com.au |
| AAPT | mail.aapt.net.au |
| Adam Internet | mail.adam.com.au |
| Alphalink | mail.alphalink.com.au |
| Amnet | mail.amnet.net.au |
| BigPond | mail.bigpond.com |
| Connexus | mail.connexus.net.au |
| Dodo | smtp.dodo.com.au |
| EFTel/Datafast | mail.eftel.net.au |
| HotKey Internet | mail.hotkey.net.au |
| iHug | smtp.ihug.com.au |
| iinet | mail.m.iinet.net.au |
| Internode | mail.internode.on.net |
| iPrimus Internet | smtp.iprimus.com.au |
| Netspace | mail.netspace.net.au |
| OptusNet | mail.optusnet.com.au |
| Ozemail | smtp.ozemail.com.au |
| OzForces | smtp.ozforces.com.au |
| Pacific Internet | smtp.pacific.net.au |
| Telstra BigPond | mail.bigpond.com |
| TPG Internet | mail.tpg.com.au |
| TSN Internet | mail.tsn.cc |
| Westnet | mail.westnet.com.au |
How To: Prevent Spam from your own Domain
HOW TO: Prevent annoying spam from your own domain
One of the more annoying types of spam is the one that seems to be coming from your own domain; or worse— from your own email address! Of course, users from your own domain don’t generally spam each other— unless you’re using one of the free web-based email services. And most of us don’t spam ourselves.
Obviously, this is coming from a spammer who has spoofed your email address, or that of someone else from your domain. Unfortunately, SMTP— the protocol that allows mail clients and servers to exchange email, allows headers to be spoofed easily.
In Exchange Server 2007, Accepted Domains tell Exchange which domains to accept email for. If a domain – e12labs.com in this example, exists as an Accepted Domain, there is no reason external senders should use that domain in the MAIL or FROM headers.
You may have remote POP3/IMAP4 users who use SMTP to send mail. However, such sessions should be authenticated, and preferably use a separate Receive Connector.
Thanks to the extensive Transport Permissions model in Exchange 2007, we can easily prevent such spam. Receive Connectors have the ms-exch-smtp-accept-authoritative-domain-sender permission which dictates whether an Accepted Domain can be used in theMAIL or FROM headers. External/internet hosts submit mail to your server without authentication, as anonymous senders. To prevent anonymous senders from sending mail using your domain(s), we need to remove the ms-exch-smtp-accept-authoritative-domain-sender permission assigned to them.
Use the following command to remove the ms-exch-smtp-accept-authoritative-domain-sender permission from NT Authority\Anonymous Logon on internet-facing Receive Connector(s):
Get-ReceiveConnector “My Internet ReceiveConnector” | Get-ADPermission -user “NT AUTHORITY\Anonymous Logon” | where {$_.ExtendedRights -like “ms-exch-smtp-accept-authoritative-domain-sender”} | Remove-ADPermission
Once this permission is removed, when anonymous senders try to submit mail using your Accepted Domain(s), here’s how the SMTP conversation goes:
220 E12Postcard.e12labs.com Microsoft ESMTP MAIL Service ready at Wed, 3 Sep 2008 06:22:43 -0700 helo 250 E12Postcard.e12labs.com Hello [172.31.0.170] mail from:[email protected] 550 5.7.1 Client does not have permissions to send as this sender
Exchange stopped spoofing of P1/envelope headers. Let’s continue the session and try to spoof the P2 headers (the ones in the DATA part of the message) — maybe that’ll work!
mail from:[email protected] 250 2.1.0 Sender OK rcpt to:[email protected] 250 2.1.5 Recipient OK data 354 Start mail input; end with . from:[email protected] subject: Header spoofing
This is how we spoof headers, spoof headers.
550 5.7.1 Client does not have permissions to send as this sender quit 221 2.0.0 Service closing transmission channel
As you can see, removing the ms-exch-smtp-accept-authoritative-domain-senderpermission stops spoofing of your domains in both envelope (P1) and message (P2) headers.
When not to remove the permission? Is there a scenario where one should not remove the ms-exch-smtp-accept-authoritative-domain-sender permission from NT Authority\Anonymous Logon? Yes, on Receive Connectors used by internal or trusted SMTP hosts (such as copiers/scanners and application servers) that submit mail without authentication.
But you do have these internal/trusted hosts submitting to a separate Receive Connector, don’t you?
Origianl Article: http://exchangepedia.com/2008/09/how-to-prevent-annoying-spam-from-your-own-domain.html
Redirecting Internal Exchange Domains to use External Domains from the EMS
Redirecting Internal Exchange Domains to use External Domains from the EMS
If you have been using an SSL Certificate to secure internal domains for your Exchange deployment such as the Client Access Server's internal FQDN (e.g. CASServer01.yourcompanyinternaldomain.com) then you will need to make preparations to not use these internal names in your SSL Certificate because of a recent CAB Forum change Certificate Authorities can no longer issue SSL Certificates with internal domain names supported.
To reconfigure your domain to use only the external domain name you have a couple of options. If you are using Active Directory you can migrate an internal Active Directory domain to a registered External name. This will change the internal FQDN of your Exchange Servers so they will reroute to a valid subdomain of your registered external domain (e.g. change from CASServer01.yourcompany.internal to CASServer01.yourcompany.com) allowing you to use a SAN certificate or a Wildcard to secure these names. Alternatively, you can redirect the internal names to use the external mail URL, but this method will not allow access to mail using the Outlook Anywhere service so users connecting over a VPN would have connection problems.
Redirecting your Exchange Server to use the External DNS Name
To update your Exchange 2007 or Exchange 2010 server you will need to run the following commands from the Exchange Management Shell and replace the Server running the Client Access Role with your external domain name. These commands update the URL for the Autodiscover service, Exchange Web Services (EWS) and the OWA Web-based Offline Address book respectively. Before running these commands you will just need to check make sure a DNS record exists mapping the IP Address to the Exchange Client Access (CAS) server. Note: Each of these commands below should be run on a single line in the Exchange Management Shell (EMS):
Collect URL information
- Get-ClientAccessServer | fl
- Set-WebServicesVirtualDirectory | fl
- Set-OABVirtualDirectory -Identity | fl
SET URL information
- Set-ClientAccessServer -Identity HostName -AutodiscoverServiceInternalUri https://mail.yourdomain.com/autodiscover/autodiscover.xml
- Set-WebServicesVirtualDirectory -Identity "HostName\EWS (Default Web Site)" -InternalUrl https://mail.yourdomain.com/ews/exchange.asmx
- Set-OABVirtualDirectory -Identity "HostName\oab (Default Web Site)" -InternalUrl https://mail.yourdomain.com/oab
Recycle the IIS Application Pools
Next to make these commands take effect you have to tell IIS to push these changes by recycling the application pools.
- Open IIS Manager by clicking Start, then enter inetmgr.
- Expand the server and expand Application Pools, then right-click on MSExchangeAutodiscoverAppPool, and select Recycle.
Set the number of rings on mobile before voicemail picks up - iphone
You can set the iPhone to wait longer or shorter than the default 20 seconds before it goes to voicemail when receiving an incoming call. This will result in a different number of rings before the voice messaging system picks up the line and plays your outgoing message. To change the amount of time the iPhone will ring follow these steps:
1. Open the phone app and dial *#61# on the Keypad. Press the Call button.
2. Locate this text on the screen: "Setting Interrogation Succeeded, Voice Call Forwarding, When Unanswered, Forwards to +" and record the 11-digit number after the + symbol.
3. Touch the Dismiss button. Now enter this code on the Keypad: *61*+ followed by the 11-digit Forwards to number recorded in step 2, followed by *11 and *ringtime#. Ringtime is the number of seconds you want your iPhone to ring before voicemail picks up. Your finished code should look something like this:
*61*+18555513466*11*30#
In the example above the ring time is set to 30 seconds. Press the Call button.
4. You should receive the message: Setting Activation Succeeded. Press Dismiss and next time you receive a call it will ring for the new amount of time before going to voicemail.
Original Article: http://www.iphonefaq.org/archives/971382
SSL Certificates for Internal Server Names
SSL Certificates for Internal Server Names
After November 1, 2015 Certificates for Internal Names Will No Longer Be Trusted
In November 2011, the CA/Browser Forum (CA/B) adopted Baseline Requirements for the Issuance and Management of Publicly-Trusted Certificates that took effect on July 1, 2012. These requirements state:
“As of the Effective Date of these Requirements, prior to the issuance of a Certificate with a Subject Alternative Name (SAN) extension or Subject Common Name field containing a Reserved IP Address or Internal Server Name, the CA shall notify the Applicant that the use of such Certificates has been deprecated by the CA / Browser Forum and that the practice will be eliminated by October 2016. Also as of the Effective Date, the CA shall not issue a certificate with an Expiry Date later than 1 November 2015 with a SAN or Subject Common Name field containing a Reserved IP Address or Internal Server Name. As from 1 October 2016, CAs shall revoke all unexpired Certificates.”
Background
The CA/B Forum is a collaborative effort between Certificate Authorities and web browsers (companies like Mozilla or Microsoft that facilitate secure connections).
Because of these new requirements, Certificate Authorities (CAs) must immediately begin to phase out the issuance of SSL Certificates for internal server names or reserved IP addresses and eliminate (revoke) any certificates containing internal names by October 2016. In addition, the baseline requirements prevent CAs from issuing internal name certificates that expire after November 1, 2015. After 2015 it will be impossible to obtain a publicly-trusted certificate for any host name that cannot be externally verified.
These baseline requirements are also being incorporated into global auditing standards. They were included in the WebTrust and ETSI auditing standards for CAs on Jan 1, 2013. Once the requirements are adopted, browsers will require certification from auditors that a CA meets the baseline requirements prior to renewing their root certificate.
What is an Internal Name?
An internal name is a domain or IP address that is part of a private network. Common examples of internal names are:
- Any server name with a non-public domain name suffix. For example, www.contoso.local or server1.contoso.internal.
- NetBIOS names or short hostnames, anything without a public domain. For example, Web1, ExchCAS1, or Frodo.
- Any IPv4 address in the RFC 1918 range.
- Any IPv6 address in the RFC 4193 range.
What Does This Mean for You?
If you are a server admin using internal names, you need to either reconfigure those servers to use a public name, or switch to a certificate issued by an internal CA before the 2015 cutoff date. All internal connections that require a publicly-trusted certificate must be done through names that are public and verifiable (it does not matter if those services are publicly accessible).
Please note that in June 2011, ICANN approved the New Generic Top-Level Domain Program (gTLD) which allows organizations, individuals, and governments to apply for top level namespaces. This will affect many SSL Certificates for internal names before the internal name cutoff date.
Change Outlook 2013 Weather Unit to Celsius
How to Change Outlook 2013 Weather Unit to Celsius, Add Location and More
One cool addition to Outlook 2013 is the weather information that’s displayed at the top of the calendar view. This new toolbar can be very helpful in planning meetings and other events. Like, you could check the weather information before chalking out a meeting plan and make sure it’s not raining that day. Likewise for other events.

However, the temperature that’s displayed in the weather information is calculated in Fahrenheit by default which is not used in many countries as Celsius. Like me, if you too are not comfortable with the Fahrenheit scale and would like to change it to Celsius, here’s how it can be done.
Change Outlook Weather
Step 1: Launch Outlook 2013 and click on the File button on the top-left corner to open the Outlook 2013 backstage view. It’s not necessary to open Calendar first and you can directly open it from the inbox view.

Step 2: Now when you are in the backstage view, select Options on the left sidebar to Open Outlook options.

Step 3: Having done that, select Calendar in Outlook options and scroll down to the end of the page to find Weather settings.

Step 4: Now simply change the Show temperature in settings from Fahrenheit to Celsius. If you want to remove weather information altogether, uncheck the option Show weather on calendar and save the settings.
That’s all, your weather settings will change from Fahrenheit to Celsius instantly. Outlook 2013 displays weather information for New York by default and it does not depend upon the configured time zone in Outlook. You must click on the small arrow near the current city that’s being displayed and select the option to add a new location. Write down the name of your city, wait for Outlook to return possible matches and select the city you want to monitor.
Conclusion
That was how you can play with the weather information in Outlook 2013. Of course there are ways outside of Outlook to check the weather.
Outlook - Enable logging (troubleshooting) option
For diagnostic purposes, Microsoft Office Outlook 2007 contains an option that turns on the logging of certain Outlook features.
In this article
About logging
Outlook contains a logging option for the following features:
- Calendar modifications
- Free/busy time changes
- Reminders
- Offline Address Book
- Transactions for the Messaging Application Programming Interface (MAPI), which is used with Microsoft Exchange, Post Office Protocol (POP3), Internet Message Access Protocol (IMAP), Simple Mail Transfer Protocol (SMTP), and Lightweight Directory Access Protocol (LDAP).
Microsoft Services uses the logged diagnostic information to help identify issues. E-mail server administrators can use some of the diagnostic data to troubleshoot problems with e-mail messages. When logging is turned on, Logging Enabledappears on the Outlook title bar to remind you not to leave logging turned on unnecessarily.


Turn logging on or off
Outlook supports the logging of its communications with various types of e-mail servers. These logs can be helpful when people are troubleshooting any problems with the transfer of messages between Outlook and the e-mail servers. Outlook can log communications with Exchange, POP3 version 3, SMTP, IMAP, and Windows Live Mail servers.
The logs of transports, such as POP3 and IMAP, are in plain text and are not encrypted.
Calendar transactions that are generated by Outlook features, by user actions, by the object model, or by the MAPI Calendar Table are written to a log file. The log file contains information about the following items:
- Sniffer (Inbox autoprocessing)
- Free/busy publishing
- Reminders
- Calendar item actions (creation, modification, or deletion)
- Resource booking
The primary purpose of the Calendar logging feature is to quickly identify situations where, for example, meetings are inexplicably deleted from a Calendar folder. To help protect customer data, the Calendar log file is a binary file that cannot be read without a conversion process. Contact Microsoft Services for additional information about this feature.
TURN ON LOGGING
- On the Tools menu, click Options.
- On the Other tab, click Advanced Options.
- Select the Enable logging (troubleshooting) check box, and then click OKtwo times.
- Restart Outlook.
After you restart Outlook, the words (Logging Enabled) will appear in the title bar indicating that the logging feature is turned on. From this point, every time Outlook sends or receives messages, the communication that occurs between Outlook and the e-mail server is written to a log file. In addition, the log file includes certain Calendar transactions, as described earlier in this topic.
IMPORTANT It is very important that you turn off logging after you complete your troubleshooting. If you do not turn off logging, the log files continue to increase in size.
TURN OFF LOGGING
- On the Tools menu, click Options.
- On the Other tab, click Advanced Options.
- Clear the Enable logging (troubleshooting) check box, and then click OKtwo times.
Log file locations
MAPI (Exchange), POP3, and SMTP transports
The log file has the name OPMLog.log and is located in one of the following locations:
- Windows Vista
c:\Users\user name\AppData\Local\Temp\Outlook Logging
- Microsoft Windows Server 2003, and Microsoft Windows XP
c:\Documents and Settings\user name\Local Settings\Temp\Outlook Logging
 The Local Settings or AppData folder is missing
The Local Settings and AppData folders are hidden by default. Do one of the following to see these folders:
- Windows Vista
- Click Start, and then click My Computer.
- On the Tools menu, click Folder Options, click the View tab, and then click the Show hidden files and folders option.
- Windows Server 2003 and Windows XP
- In Windows, click the Start button, and then click Control Panel.
- Under Pick a Category, double-click Performance and Maintenance.
NOTE If you are using Classic View in Control Panel, skip to the next step.
- Under See Also, click File Types.
NOTE If you are using Classic View in Control Panel, double-click Folder Options.
- Click the View tab.
- Under Advanced settings, under Files and Folders, underHidden files and folders, click Show hidden files and folders.
IMAP transport
The log file name is similar to IMAP-ExampleCom-07_19_2007-14_03_44_865.log and is located in one of the following locations:
- Windows Vista
c:\Users\user name\AppData\Local\Temp\Outlook Logging
- Windows Server 2003 and Windows XP
c:\Documents and Settings\user name\Local Settings\Temp\Outlook Logging
The Local Settings or AppData folder is missing
The Local Settings and AppData folders are hidden by default. Do one of the following to see these folders:
- Windows Vista
- Click Start, and then click My Computer.
- On the Tools menu, click Folder Options, click the View tab, and then click the Show hidden files and folders option.
- Windows Server 2003 and Windows XP
- In Windows, click the Start button, and then click Control Panel.
- Under Pick a Category, double-click Performance and Maintenance.
NOTE If you are using Classic View in Control Panel, skip to the next step.
- Under See Also, click File Types.
NOTE If you are using Classic View in Control Panel, double-click Folder Options.
- Click the View tab.
- Under Advanced settings, under Files and Folders, underHidden files and folders, click Show hidden files and folders.
Windows Live Mail (HTTP-DAV protocol)
The log file name is similar to HTTP-someoneexamplecom-05_17_2007-10_41_24_724.log and is located in one of the following locations:
- Windows Vista
c:\Users\user name\AppData\Local\Temp\Outlook Logging
- Windows Server 2003 and Windows XP
c:\Documents and Settings\user name\Local Settings\Temp\Outlook Logging
The Local Settings or AppData folder is missing
The Local Settings and AppData folders are hidden by default. Do one of the following to see these folders:
- Windows Vista
- Click Start, and then click My Computer.
- On the Tools menu, click Folder Options, click the View tab, and then click the Show hidden files and folders option.
- Windows Server 2003 and Windows XP
- In Windows, click the Start button, and then click Control Panel.
- Under Pick a Category, double-click Performance and Maintenance.
NOTE If you are using Classic View in Control Panel, skip to the next step.
- Under See Also, click File Types.
NOTE If you are using Classic View in Control Panel, double-click Folder Options.
- Click the View tab.
- Under Advanced settings, under Files and Folders, underHidden files and folders, click Show hidden files and folders.
NOTES
- IMAP and Windows Live ID accounts generate one log for each Send/Receive action that you perform on these accounts.
- You may need to exit Outlook for the logs to be written to the log files.
Administrator information
Additionally, you can deploy logging settings to users. Default Outlook logging settings can be configured in the Office Customization Tool (OCT) on the Modify User Settings page, or you can enforce the settings by using the Outlook Group Policy template (Outlk12.adm) in the Group Policy Editor.
To enforce logging settings for Outlook users, do the following:
- In Group Policy, in the Office Outlook 2007 policy template Outlk12.adm, under User configuration\Administrative templates\Microsoft Outlook 12\Tools | Options\Other\Advanced, double-click Enable mail logging (troubleshooting). Select Enabled to enable configuring the settings.
- Select or clear the Enable mail logging (troubleshooting) check box.
Because of performance and security reasons, we do not recommend that you deploy the logging feature. You should turn on the logging feature only when you need it.
Original Article: http://office.microsoft.com/en-us/outlook-help/what-is-the-enable-logging-troubleshooting-option-HA001230421.aspx
Outlook and Outlook Express - Troubleshooting Error Messages
Troubleshooting error messages that you receive when you try to send and receive e-mail in Outlook and Outlook Express
View products that this article applies to.
On This Page
SYMPTOMS
When you try to send and receive e-mail, you may receive an error message that resembles one of the following:
-
No connection could be made because the target machine actively refused it.
-
The server could not be found. (Account:account name, POPserver:'mail', Error Number: 0x800ccc0d)
-
Task 'server name - Sending and Receiving' reported error (0x800ccc0f): 'The connection to the server was interrupted. If this problem continues, contact the server administrator or Internet service provider (ISP). The server responded: ? K'
-
Your server has unexpectedly terminated the connection. Possible causes of this include server problems, network problems, or a long period of inactivity. Account. account name, Server: 'server name', Protocol: POP3, Server Response: '+OK', Port: 110, Secure(SSL): No, Error Number: 0x800ccc0f
-
Task 'SMTP server name - Sending and Receiving' reported error (0x80042109): 'Outlook is unable to connect to your outgoing (SMTP) e-mail server. If you continue to receive this message, contact the server administrator or Internet service provider (ISP).'
-
The operation timed out waiting for a response from the receiving (POP) server 0x8004210a
-
A time-out occurred while communicating with the server 0x800ccc19
You may also receive an error message that includes one or more of the following error codes:
- 0x800ccc15
- 0x80042108
- 0x800ccc0e
- 0x8004210b
- 0x800ccc0b
- 0x800ccc79
- 0x800ccc67
- 0x80040900
- 0x800ccc81
For more information about resolution for time-out messages, see the "More Information" section.
CAUSE
These error messages may occur if Microsoft Outlook or Microsoft Outlook Express cannot establish a connection with your e-mail server. These error messages are frequently caused by one of the following:
- You are not connected to the Internet or a network, or your mail server is temporarily unavailable.
- Your account settings are incorrect.
- Your user profile in Outlook is damaged.
- An e-mail item on your POP3 server is damaged.
- The configuration of your AV software is incorrect.
- Outlook Express was removed from the computer or the installation is damaged.
- The configuration of your personal firewall software is incorrect.
RESOLUTION
The methods described in this article are for both beginning and advanced users.
The most common causes of these error messages are problems with Internet connectivity and account settings configured incorrectly in Outlook or Outlook Express. First, verify that you are connected to the Internet. To do this, go to method 1.
Method 1: Verify that you are connected to the Internet
Click here to view or hide detailed information
Method 2: Verify your account settings
Click here to view or hide detailed information
Advanced troubleshooting
If you still have problems sending and receiving mail after you have verified your e-mail server settings with your e-mail service provider, the following steps provide advanced troubleshooting. If you are not comfortable with advanced troubleshooting, you might want to ask someone for help or contact Support. For information about how to do this, visit the following Microsoft Web site:
Select a Product Solution Center
Perform the following methods in order. If one method does not resolve the issue, move on to the next one.
Method 3: Start Outlook in safe mode
Click here to view or hide detailed information
Method 4: Create a new e-mail profile
Click here to view or hide detailed information
Method 5: Delete suspicious messages from your mailbox
Click here to view or hide detailed information
Method 6: Check your antivirus vendor's Web site for additional suggestions
Click here to view or hide detailed information
Method 7: Repair Outlook Express
Click here to view or hide detailed information
Method 8: Verify that all SMTP e-mail addresses in a distribution list are valid
Click here to view or hide detailed information
Method 9: Examine the configuration of your firewall software
Click here to view or hide detailed information
MORE INFORMATION
If the error code is accompanied by a time-out error message, you may be able to resolve this problem by increasing the server time-out setting in Outlook or Outlook Express. To increase the server time-out setting, use the following method that is appropriate for your version of Outlook or Outlook Express.
Outlook 2000 Corporate or Workgroup mode (CW)
- Start Outlook.
- On the Tools menu, click Services.
- On the Services tab, select Internet E-mail, and then click Properties.
- Click the Advanced tab.
- Gradually increase the server time-out setting until the problem is resolved.
Outlook 2000 Internet Mail Only (IMO)
- Start Outlook.
- On the Tools menu, click Accounts.
- Select the target account, and then click Properties.
- Click the Advanced tab.
- Gradually increase the server time-out setting until the problem is resolved.
Outlook 2002 and Outlook 2003
- Start Outlook.
- On the Tools menu, click E-mail Accounts.
- Click View or change existing e-mail accounts, and then click Next.
- Click your POP3 account, and then click Change.
- Click More Settings.
- Click the Advanced tab.
- Gradually increase the server time-out setting until the issue is resolved.
Outlook 2007
- Start Outlook.
- On the Tools menu, click Account Settings.
- Click to select the target POP3 account, and then click Change.
- Click More Settings.
- Click the Advanced tab.
- Gradually increase the server time-out setting until the issue is resolved.
Outlook 2010
- Start Outlook.
- On the Files menu, click Info.
- Click Account Settings, and then select Account Settings from the list.
- Click to select the target POP3 account, and then click Change.
- Click More Settings.
- Click the Advanced tab.
- Gradually increase the server time-out setting until the issue is resolved.
Outlook Express 5.x and 6.0
- Start Outlook Express.
- On the Tools menu, click Accounts.
- Click the Mail tab.
- Click your POP3 account, and then click Properties.
- Click the Advanced tab.
- Gradually increase the server time-out setting until the problem is resolved.
The third-party products that this article discusses are manufactured by companies that are independent of Microsoft. Microsoft makes no warranty, implied or otherwise, about the performance or reliability of these products.
Was this information helpful? Please send us your feedback
NEXT STEPS
If these methods did not work for you, you can use the Microsoft Customer Support Services Web site to find other solutions to your problem. Some services that the Microsoft Customer Support Services Web sites provide include the following:
- Searchable Knowledge Base : Search technical support information and self-help tools for Microsoft products.
- Solution Centers : View product-specific frequently asked questions and support highlights.
- Microsoft Customer Support Newsgroups : Contact counterparts, peers, and Microsoft Most Valuable Professionals (MVPs).
- Other Support Options : Use the Web to ask a question, contact Microsoft Customer Support Services, or provide feedback.
Original Article: http://support.microsoft.com/kb/813514
Services Installed by Exchange 2010
Overview of Services Installed by Exchange Setup
Exchange 2010
Applies to: Exchange Server 2010 SP3, Exchange Server 2010 SP2
Topic Last Modified: 2012-06-21
During the installation of Microsoft Exchange Server 2010, Setup runs a set of tasks that install new services. A service is a background process that can be launched during operating system startup by the Service Control Manager in Microsoft Windows. Services are executable files designed to operate independently and without administrative intervention. A service can run using either a graphical user interface (GUI) mode or a console mode.
Services aren't new to Exchange 2010. All previous versions of Exchange included components implemented as services. Each server role includes services that are part of, or may be needed by, the server role to perform its functions. Although Setup installs all services whether they're immediately needed or not, some services only become active when specific features are used.
The following table lists by name and by short name the various services installed by Exchange 2010. Also included is a description of each service, the server role that installs the service, and whether the service is required or optional. In the table, optional means that the service is installed by Setup, but you can disable it if you determine that the function provided by the service isn't needed by your organization.
Services installed by Exchange Setup
| Service name | Service short name | Security context | Description and dependencies | Default startup type | Server roles | Required (R) or optional (O) |
|---|---|---|---|---|---|---|
|
Microsoft Exchange Active Directory Topology |
MSExchangeADTopology |
Local System |
Provides Active Directory topology information to Exchange services. If this service is stopped, most Exchange services are unable to start. This service has no dependencies. |
Automatic |
Mailbox, Hub Transport, Client Access, Unified Messaging |
R |
|
Microsoft Exchange ADAM |
ADAM_MSExchange |
Network Service |
Stores configuration data and recipient data on the Edge Transport server. This service represents the named instance of Active Directory Lightweight Directory Service (AD LDS) that's automatically created by Setup during Edge Transport server installation. This service is dependent upon the COM+ Event System service. |
Automatic |
Edge Transport |
R |
|
Microsoft Exchange Address Book |
MSExchangeAB |
Local System |
Manages client address book connections. This service is dependent upon the Microsoft Exchange Active Directory Topology service. |
Automatic |
Client Access |
R |
|
Microsoft Exchange Anti-spam Update |
MSExchangeAntispamUpdate |
Local System |
Provides the Microsoft Forefront Protection 2010 for Exchange Server anti-spam update service. On Hub Transport servers, this service is dependent upon the Microsoft Exchange Active Directory Topology service. On Edge Transport servers, this service is dependent upon the Microsoft Exchange ADAM service. |
Automatic |
Hub Transport, Edge Transport |
O |
|
Microsoft Exchange Credential Service |
MSExchangeEdgeCredential |
Local System |
Monitors credential changes in AD LDS and installs the changes on the Edge Transport server. This service is dependent upon the Microsoft Exchange ADAM service. |
Automatic |
Edge Transport |
R |
|
Microsoft Exchange EdgeSync |
MSExchangeEdgeSync |
Local System |
Connects to an AD LDS instance on subscribed Edge Transport servers over a secure LDAP channel to synchronize data between a Hub Transport server and an Edge Transport server. This service is dependent upon the Microsoft Exchange Active Directory Topology service. If Edge Subscription isn't configured, this service can be disabled. |
Automatic |
Hub Transport |
O |
|
Microsoft Exchange File Distribution |
MSExchangeFDS |
Local System |
Distributes offline address book (OAB) and custom Unified Messaging prompts. This service is dependent upon the Microsoft Exchange Active Directory Topology and Workstation services. |
Automatic |
Client Access, Unified Messaging |
R |
|
Microsoft Exchange Forms-Based Authentication |
MSExchangeFBA |
Local System |
Provides forms-based authentication to Microsoft Office Outlook Web App and the Exchange Control Panel. If this service is stopped, Outlook Web App and the Exchange Control Panel won't authenticate users. This service has no dependencies. |
Automatic |
Client Access |
R |
|
Microsoft Exchange IMAP4 |
MSExchangeIMAP4 |
Network Service |
Provides IMAP4 service to clients. If this service is stopped, clients won't be able to connect to this computer using the IMAP4 protocol. This service is dependent upon the Microsoft Exchange Active Directory Topology service. |
Manual |
Client Access |
O |
|
Microsoft Exchange Information Store |
MSExchangeIS |
Local System |
Manages the Exchange Information Store. This includes mailbox databases and public folder databases. If this service is stopped, mailbox databases and public folder databases on this computer are unavailable. If this service is disabled, any services that explicitly depend on it will fail to start. This service is dependent on the RPC, Server, Windows Event Log, and Workstation services. |
Automatic |
Mailbox |
R |
|
Microsoft Exchange Mail Submission Service |
MSExchangeMailSubmission |
Local System |
Submits messages from the Mailbox server to Exchange 2010 Hub Transport servers. This service is dependent upon the Microsoft Exchange Active Directory Topology service. |
Automatic |
Mailbox |
R |
|
Microsoft Exchange Mailbox Assistants |
MSExchangeMailboxAssistants |
Local System |
Performs background processing of mailboxes in the Exchange store. This service is dependent upon the Microsoft Exchange Active Directory Topology service. |
Automatic |
Mailbox |
R |
|
Microsoft Exchange Mailbox Replication Service |
MSExchangeMailboxReplication |
Local System |
Processes mailbox moves and move requests. This service is dependent upon the Microsoft Exchange Active Directory Topology and Net.Tcp Port Sharing service. |
Automatic |
Client Access |
O |
|
Microsoft Exchange Monitoring |
MSExchangeMonitoring |
Local System |
Allows applications to call the Exchange diagnostic cmdlets. This service has no dependencies. |
Manual |
All |
O |
|
Microsoft Exchange POP3 |
MSExchangePOP3 |
Network Service |
Provides POP3 service to clients. If this service is stopped, clients can't connect to this computer using the POP3 protocol. This service is dependent upon the Microsoft Exchange Active Directory Topology service. |
Manual |
Client Access |
O |
|
Microsoft Exchange Protected Service Host |
MSExchangeProtectedServiceHost |
Local System |
Provides a host for several Exchange services that must be protected from other services. This service is dependent upon the Microsoft Exchange Active Directory Topology service. |
Automatic |
Hub Transport, Client Access |
R |
|
Microsoft Exchange Replication Service |
MSExchangeRepl |
Local System |
Provides replication functionality for mailbox databases on Mailbox servers in a database availability group (DAG) and database mount functionality for all Mailbox servers. This service is dependent upon the Microsoft Exchange Active Directory Topology service. |
Automatic |
Mailbox |
R |
|
Microsoft Exchange RPC Client Access |
MSExchangeRPC |
Network Service |
Manages client RPC connections for Exchange. This service is dependent upon the Microsoft Exchange Active Directory Topology service. |
Automatic |
Mailbox, Client Access |
O (Mailbox), R (Client Access) |
|
Microsoft Exchange Search Indexer |
MSExchangeSearch |
Local System |
Drives indexing of mailbox content, which improves the performance of content search. This service is dependent upon the Microsoft Exchange Active Directory Topology and Microsoft Search (Exchange Server) services. |
Automatic |
Mailbox |
O |
|
Microsoft Exchange Server Extension for Windows Server Backup |
WSBExchange |
Local System |
Enables Windows Server Backup users to back up and recover application data for Microsoft Exchange. This service has no dependencies. |
Manual |
Mailbox |
O |
|
Microsoft Exchange Service Host |
MSExchangeServiceHost |
Local System |
Provides a host for several Exchange services. On internal server roles, this service is dependent upon the Microsoft Exchange Active Directory Topology service. On Edge Transport servers, this service is dependent upon the Microsoft Exchange ADAM service. |
Automatic |
All |
R |
|
Microsoft Exchange Speech Engine |
MSSpeechService |
Network Service |
Provides speech processing services for Unified Messaging. This service is dependent upon the Windows Management Instrumentation (WMI) service. |
Automatic |
Unified Messaging |
R |
|
Microsoft Exchange System Attendant |
MSExchangeSA |
Local System |
Forwards directory lookups to a global catalog server for legacy Outlook clients, generates e-mail addresses and OABs, updates free/busy information for legacy clients, and maintains permissions and group memberships for the server. If this service is disabled, any services that explicitly depend on it will fail to start. This service is dependent on the RPC, Server, Windows Event Log, and Workstation services. |
Automatic |
Mailbox |
R |
|
Microsoft Exchange Throttling |
MSExchangeThrottling |
Network Service |
Limits the rate of user operations. This service is dependent upon the Microsoft Exchange Active Directory Topology service. |
Automatic |
Mailbox |
R |
|
Microsoft Exchange Transport |
MSExchangeTransport |
Network Service |
Provides SMTP server and transport stack. On Hub Transport servers, this service is dependent upon the Microsoft Exchange Active Directory Topology service. On Edge Transport servers, this service is dependent upon the Microsoft Exchange ADAM service. |
Automatic |
Hub Transport, Edge Transport |
R |
|
Microsoft Exchange Transport Log Search |
MSExchangeTransportLogSearch |
Local System |
Provides remote search capability for Microsoft Exchange Transport log files. On Hub Transport servers, this service is dependent upon the Microsoft Exchange Active Directory Topology service. On Edge Transport servers, this service is dependent upon the Microsoft Exchange ADAM service. |
Automatic |
Hub Transport, Mailbox, Edge Transport |
O |
|
Microsoft Exchange Unified Messaging |
MSExchangeUM |
Local System |
Enables Microsoft Exchange Unified Messaging features. This allows voice and fax messages to be stored in Exchange and gives users telephone access to e-mail, voice mail, calendar, contacts, or an auto attendant. If this service is stopped, Unified Messaging isn't available. This service is dependent upon the Microsoft Exchange Active Directory Topology and the Microsoft Exchange Speech Engine service. |
Automatic |
Unified Messaging |
R |
|
Microsoft Search (Exchange Server) |
msftesql-Exchange |
Local System |
This is a Microsoft Exchange-customized version of Microsoft Search. This service is dependent on the RPC service. |
Manual |
Hub Transport, Mailbox |
O |
© 2010 Microsoft Corporation. All rights reserved.
https://technet.microsoft.com/en-us/library/ee423542%28v=exchg.141%29.aspx?f=255&MSPPError=-2147217396